Hello ladies and gentlemen, you who seek wisdom yet couldn’t find an appropriate answer for your question about Fabric.js on Stack Overflow.
In this Fabric.js tutorial, I will show you how to do the following:
- Draw a rectangle or an ellipse with a mouse
- Freehand drawing
- Line drawing with a mouse
- Polygon drawing
- Adding text to a canvas
- Stop event propagations and ID
- Fill shapes with color; color the lines, eraser
- When one ellipse is moved/scaled/removed, all the others follow it’s fate
Oh boy, we’re gonna have so much fun!
As a teaser, here is a screenshot of the final results.
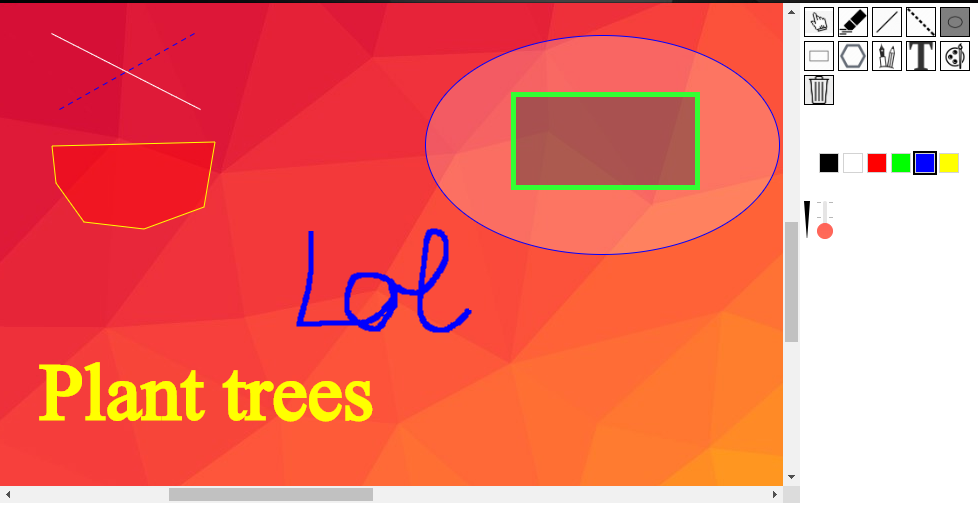
As you can see, this is paint-like stuff but in the BROWSER!
Before we get into this, let me tell you a few things about Fabric.js.
What is Fabric.js?
This is a quick recap for those who don’t know Fabric.js. It is a Javascript lib that takes a normal HTML canvas and gives it some advanced functionalities.
By default, Fabric.js supports object-based drawing among other fancy features like animations, scaling, and transforming.

Just look at that cute animated ladybug. If that isn’t lit, I don’t know what is. The most important topic is advanced event emitting, so we use that deeply and some workarounds to accomplish freehand drawing.
FabricJS demo project
My example project was made with Angular 8, but you can adapt in Vue or React as well. It’s under the MIT license, so copy as much code as you wish.

Here is how the repo’s structure looks:
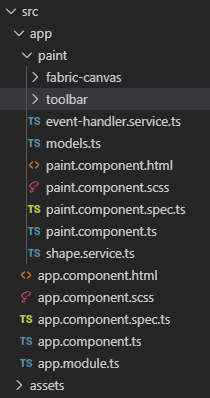
The paint component puts the toolbar and the canvas next to each other; event-handler.service.ts takes care of all the business logic between the toolbar and the events on the canvas, while shape.service.ts contains the helper functions to draw shapes.
I know testing is important, but 99% of you won’t even glance at the .test.ts files. For the enthusiasts, I would be more than happy for some test MR-s. Feel free to contribute, mates!
Canvas initializing
Fabric.js is based on HTML5 canvas, so just put a canvas object into an HTML file, with an id, and that’s it.
 <div class="canvas-wrapper">
   <canvas id="canvas"></canvas>
 </div>
In the controller’s AfterContentInit lifecycle hook (so the canvas was rendered inside the nice wrapper):
 this.canvas = new fabric.Canvas('canvas', {
   selection: false,
   preserveObjectStacking: true
 });
Pro tip: If you have more than one canvas element on the screen, or like in my example, multiple fabric-canvas components, "canvas” should be replaced in the constructor with the proper selected HTMLCanvasElement. You could use @ViewChild for example. Otherwise, it works like a document.querySelector, finding the first element with the id "canvas.”
Drawing Rectangle and Ellipse with Fabric.js
The basic idea here is that mouse down marks the starting point, and until you release the button, the shape is continually drawn on the canvas. So, the three events are the following:
- mouse:down
- mouse:move
- mouse:up
On mouse:down, we set a private variable to signal that a drawing is in progress. We ignore every mouse:move event unless we are in drawing mode. We also store the starting position, because we need some basic math to calculate the new dimensions while moving from the starting point to the current position of the cursor.
 const ellipse = new fabric.Ellipse({
   left: pointer.x,
   top: pointer.y,
   strokeWidth: thickness,
   stroke: colour,
   fill: this.setOpacity(DrawingColours.WHITE, DEFAULT_OPACITY),
   originX: 'left',
   originY: 'top',
   rx: 0,
   ry: 0,
   selectable: false,
   hasRotatingPoint: false
 }) as CustomFabricEllipse;
 ellipse.id = uuid();
 canvas.add(ellipse);
-------------------------------------
 const rect = new fabric.Rect({
   left: pointer.x,
   top: pointer.y,
   strokeWidth: thickness,
   stroke: colour,
   fill: this.setOpacity(DrawingColours.WHITE, DEFAULT_OPACITY),
   width: 0,
   height: 0,
   selectable: false,
   hasRotatingPoint: false
 }) as CustomFabricRect;
 rect.id = uuid();
 canvas.add(rect);
We put down an initial shape on the canvas, and we modify it on the move event as follows:
 ellipse.set({
   rx: Math.abs((initPos.x - pointer.x) / 2),
   ry: Math.abs((initPos.y - pointer.y) / 2)
 });
 ellipse.setCoords();
------------------------------------------------------
 rect.set({
   width: Math.abs(initPos.x - pointer.x),
   height: Math.abs(initPos.y - pointer.y)
 });
 rect.set({ left: Math.min(pointer.x, initPos.x) });
 rect.set({ top: Math.min(pointer.y, initPos.y) });
 rect.setCoords();
In case of the ellipse, we only let it grow from the top-left to the bottom right. If you move the cursor left, the ellipse will grow in the same amount BUT towards the right. SetCoords recalculates the control points for scaling the shape later.
In case of the rectangle, we did a little trick, so it allows the user to form the shape any direction he wants. With the same thinking, you could re-orient the ellipse’s left and top, or simply choose originX and originY to be "center,” so it’s growing evenly in every direction from the starting point.
Free-hand-drawing with Fabric.js
Fabric.js supports this feature out of the box, with different brushes and everything, but I would like to create something that I can control 100%.
Also, it helps to understand that under the hood, it’s just a fancy path if we are talking in SVG representation.
How hard could it be to create a path by ourselves?
The answer is, pretty hard.
There are 2 options:
- fabric.Path
- fabric.Polyline
Initially, I started with fabric.Path, but for some reason, I couldn’t get it right. So, I went with fabric.Polyline, which just puts points one after the other, connected with lines.
It worked on the first try.
However, I came back later to this problem when I needed to de-serialize and serialize from and to SVG. The problem was that fabric.Path’s path attribute contains an array of fabric.Points.
Point’s constructor is tricky by default, because it has x and y. Everything is normal so far, but the Point has another attribute: type.
Sidenote for those not familiar with SVG: an SVG path consists of 3 parts: the type, the x and the y.
Ultimately, I realized that a fabric.Point is quite the same. I thought, no problem: GG, EZ.
I’d never been so wrong in my life. TypeScript was happy; I provided the points WITH TYPE this time, but still, nothing happened on the screen.
After further investigation, I checked that the built-in SVG->Fabric parser (which is brilliant by the way) parses the Path as an array of arrays, not as an array of fabric.Points.
So, a new line in the path is the following: [‘L’, x, y].
Facepalm.
The final solution, fellow code-knights, with just one disgusting "any.”
mouse:down
 const path = new fabric.Path(`M ${pointer.x} ${pointer.y}`, {
   strokeWidth: selectedThickness,
   stroke: selectedColour,
   fill: '',
   selectable: false,
   hasRotatingPoint: false
 }) as CustomFabricPath;
 path.id = uuid();
 canvas.add(path);
mouse:move
 const newLine = ['L', pointer.x, pointer.y];
 path.path.push(newLine as any);
Those 2 lines cost me many hours, so if anything, this is the MOST IMPORTANT PART of this blogpost. Don’t always believe what typing tells you. It’s like with anti-bacterial soap: it takes care of 99%, but that remaining 1% is what kills you.
Line-dashed line
Nothing exciting here.
mouse:down
 const line = new fabric.Line([pointer.x, pointer.y, pointer.x, pointer.y], {
   strokeWidth: selectedThickness,
   stroke: selectedColour,
   fill: this.setOpacity(DrawingColours.WHITE, DEFAULT_OPACITY),
   strokeDashArray: dashArray,
   selectable: false,
   hasRotatingPoint: false
  }) as CustomFabricLine;
 line.id = uuid();
 canvas.add(line);
mouse:move
 line.set({ x2: pointer.x, y2: pointer.y });
 line.setCoords();
Polygon
There are many ways of drawing a polygon. Mine was to draw the first line as with the line/dashed line example. After that, an additional click marks the next side of the shape, and so on. But how do we finish?
One way could be with right clicking, or clicking outside of the canvas. My specification was for the user to click on the center. Wow, it better should be some Superman who finds that one pixel in the middle.
To avoid furious users, I created a constant (RANGE_AROUND_CENTER = 20) to give them at least a little chance to hit the bullseye.
I used mathematical average with the biggest and smallest coordinates; there may be better solutions, but this was good enough for our case.
 const centerXOfPolygon = (
   Math.max(...polygon.points.map(p => p.x)) +
   Math.min(...polygon.points.map(p => p.x))
 ) / 2;
 const centerYOfPolygon = (
   Math.max(...polygon.points.map(p => p.y)) +
   Math.min(...polygon.points.map(p => p.y))
 ) / 2;
 return (
   Math.abs(pointer.x - centerXOfPolygon) <= range &&
   Math.abs(pointer.y - centerYOfPolygon) <= range
 );
Text
Fabric.js supports 2 type of texts. Both of them are highly configurable:
- fabric.Text
- fabric.IText
The only difference is that IText can be edited on the canvas, without any programming. I used this for the Text tool.
Stop event propagations and ID
In the initial project, we used Form.io and also contributed to the Angular library to give back something to the community.
That lib is highly dependent on the drag mouse event, so we don’t want to trigger form-field reordering when drawing some amazing lines on our simple canvas.
 private onCanvasMouseDown(event: { e: Event }) {
   this.eventHandler.mouseDown(event.e);
   event.e.stopPropagation();
 }
Fabric objects do not have an ID by default, and we would need it during serialization, so I refactored the default method provided to make it Typescript compatible, and tada!
fabric.Object.prototype.toObject = (function(toObject) {
  return function(this: CustomFabricObject) {
    return fabric.util.object.extend(toObject.call(this), {
      id: this.id
    });
  };
})(fabric.Object.prototype.toObject);
Colors and thickness/eraser
You can set the color and the thickness of the lines of the drawing. Since we are dealing with objects that are represented with visible elements on the canvas, we can add whatever custom logic we want for events.
For example, I decided to fill up the shapes with the combination of the selected color and the Paint-bin tool, and I changed the stroke colors of the lines and texts where there was nothing to fill. They are all just properties to change, so the limit is only your imagination.
 objectSelected(object: CustomFabricObject): void {
   this.previousLeft = object.left;
   this.previousTop = object.top;
   this.previousScaleX = object.scaleX;
   this.previousScaleY = object.scaleY;
   switch (this._selectedTool) {
     case DrawingTools.ERASER:
       if (object.type === FabricObjectType.ELLIPSE) {
         const otherEllipses = this.getOtherEllipses(object.id);
         otherEllipses.forEach(e => this.canvas.remove(e));
       }
       this.canvas.remove(object);
       break;
     case DrawingTools.FILL:
       this.fabricShapeService.fillShape(object, this._selectedColour);
       break;
   }
 }
In the beginning, a new shape was selected so we would like to store the basic coordinates for our reasons (next chapter - involving an excellent group resize-rescale logic).
In my example above, it is only an easy state machine. If the selected tool was Eraser, I remove the targeted object, in the case of an ellipse, remove all of them. If the tool was Fill, I let the ShapeService take care of the object modification, as every creation/modification is in the scope of the ShapeService.
Selecting, moving and scaling objects in Fabric.js
With the selection tool, you disable other tools, so you can move and scale objects around on the canvas. But wait, we set every object as "unselectable” on the mouse:down creation part.
Yep, because we don’t want drawing-clicking and selecting another shape at the same time. In this state-machine, you are either drawing or selecting shapes when clicking that left button on the canvas.
With the help of Fabric.js, we can listen to events and react accordingly, as we are moving a rectangle with drag&drop; it fires an "object:moving” event, so in case of ellipses, we modify all the others as well.
 objectMoving(id: string, type: FabricObjectType, newLeft: number, newTop: number){
   if (type !== FabricObjectType.ELLIPSE) {
     return;
   }
   const diffX = newLeft - this.previousLeft;
   const diffY = newTop - this.previousTop;
   this.previousLeft = newLeft;
   this.previousTop = newTop;

   const otherEllipses = this.getOtherEllipses(id);
   otherEllipses.forEach(e => {
     e.left += diffX;
     e.top += diffY;
   });
 }
Unfortunately, none of the moving event’s attributes contain the info on how much it has been moved since the last event, it only stores the original position at the very beginning of the drag. The simple trick for this is that WE store the previous position during movement.
The same goes for scaling. An additional note here is that if you scale the ellipse’s right edge over the left edge, it changes the left position as well. Because of this, we need to trigger a moving at the end too. Similar with the bottom edge, it can modify the top position.
 objectScaling(
   id: string,
   type: FabricObjectType,
   newScales: { x: number; y: number },
   newCoords: { left: number; top: number },
 ) {
   if (type !== FabricObjectType.ELLIPSE) {
     return;
   }
   const scaleDiffX = newScales.x - this.previousScaleX;
   const scaleDiffY = newScales.y - this.previousScaleY;
   this.previousScaleX = newScales.x;
   this.previousScaleY = newScales.y;

   const otherEllipses = this.getOtherEllipses(id);
   otherEllipses.forEach(e => {
     e.scaleX += scaleDiffX;
     e.scaleY += scaleDiffY;
   });
   this.objectMoving(id, type, newCoords.left, newCoords.top);
 }
Fabric.js also supports grouping, but I didn’t want to mess with it, as I needed custom SVG transformation and God knows how grouped objects are mapped to SVG.
Conclusion
Fabric.js is one of the best, if not the best, drawing lib on the market atm. If you find a better one, please link it in the comments, I’m eager to check it out. It’s also under active development, so next to some silly typings, I couldn’t find any irritating things about it, but I used it with great results in the past. So check out its other features as well. Maybe it is what you have been searching for in the last days.
Further reading:
👉 8+1 Tips and Tricks for Building Large-Scale Enterprise Angular Applications


_ We’re a full-stack web development agency, building web applications from design to delivery with Angular, React, and Node.js