
I made some Cordova and Ionic 1 applications in the last few years and really liked the simplicity of cross-platform development.
I’m really excited about the new Ionic 2 framework, which was recently released. They switched AngularJS version to Angular version 2.
After reading many posts about the new features and digging into the Ionic docs, I decided to make a simple Ionic 2 app with some native plugins (Camera, Google Maps and GPS Location).
The best thing?
I didn’t have to deal with any backend development because I used Firebase real-time database.
In this post, I show you how to integrate the most requested native features with Ionic 2 framework and create a cross-platform application.
This post is huge! Use the links below to jump between sections:
- Part 1: Setup Ionic 2 app and take a photo with a native camera
- Part 2: Add a local storage persistence layer for your photos
- Part 3: Use location plugins to add coordinates for every photo taken and place your images on Google Maps
- Part 4: Change the persistence layer with Firebase, and make a real-time application

PART1: SETUP IONIC 2 APP AND TAKE A PHOTO WITH A NATIVE CAMERA
For building cross-platform mobile applications with Ionic 2, the easiest way is to use Ionic-CLI, which is included in the Ionic npm package. You have to install Ionic as a global dependency by using this command:
npm i -g ionic
For using the native plugins, Ionic 2 uses Cordova integrations, which can be installed through npm:
npm i -g cordova
After installing these two main frameworks, you can easily start a new project from CLI. This could take a few minutes.
My application name will be ionic-photo-maps, and the --v2 flag means we want to generate an Ionic 2 app with Angular version 2 (without this flag, an Ionic 1 project would be generated, which uses Angular 1).
ionic start ionic-photo-maps --v2
You can test the generated app with the ionic serve command, which will run in your main browser. If you are building the layout for the app, this will be enough, but most of the native Cordova plugins only work on a real device or on an emulator.
To use an Andriod phone or an emulator, you should add the Android Cordova platform with this command: ionic platform add android
Help us spread the love and share this post! 🚀
How to Build an Ionic 2 App with Native Plugin Integrationshttps://t.co/buyoPNg5Zfpic.twitter.com/ngcGaB3sH4 — CodingSans (@codingsans) 27 February 2017
DEPLOYING THE APPLICATION ON AN EMULATOR AND A DEVICE
Deploy to Android
You have to get the Android sdk installed on your computer. If it hasn’t been installed yet, you can download it here.
Use this command to install and run on Android:
ionic run android --device
You can use an emulator for an Android deploy. Ionic can deploy your application to the default Android emulator or a Genymotion emulator.
Deploy to iOS (only works on MacOS)
If you don’t have an iOS device, you can only test the application with an iOS simulator.
First, you will need to add the iOS platform to your application with the ionic platform add ios command. This will generate an XCode project for you. If you miss this step, the next command will raise an error, like this one:
Error: The provided path "/some-path-to-project/platforms/ios" is not a Cordova iOS project.
To run the project on your device with ionic-cli, you will need to install iOS-deploy through npm. You will receive a warning message with this information if you type the Ionic run iOS command.
Install ios-deploy to deploy iOS applications to devices. `npm install -g ios-deploy` (may require sudo)
But, if you have an XCode installed, it contains an iOS simulator and the run command will fall back from device deploying to simulator deploying.
It doesn’t guarantee that every native plugin will work correctly on the simulator, but I tested the location and Google Maps plugin, and I had no issues with them.
IONIC 2 APP STRUCTURE
Next, I want to customize the generated files. The blank Ionic project has one page, which is the root component called Home. We can modify this, remove and make our own root page for the application’s home page. I decided to modify this generated page.
I modified the homepage with navigation cards. The card list now contains one element. This will send us to the Photo Page. Here, we can make photos with the native camera plugin and show a preview as base64 image string.
My home page’s html looks like this code snippet:
<ion-content class="card-background-page">
  <ion-card (click)="goPhotoPage()">
    <img src="assets/images/photo-menu-bg.jpg"/>
    <div class="card-title">Take a picture</div>
  </ion-card>
</ion-content>
In the HTML, I have this line:
<img src="assets/images/photo-menu-bg.jpg"/>
I’m using a static image from the assets folder for the navigation card.
To properly use static assets in your project, here is some detailed information.
Note: the DOM contains only one function: the goPhotoPage() which we need to add to the home.ts:
import { Component } from '@angular/core';
import { NavController } from 'ionic-angular';
import { PhotoPage } from './../photo/photo';

@Component({
  selector: 'page-home',
  templateUrl: 'home.html'
})
export class HomePage {
  constructor(
    public navCtrl: NavController
  ) {}

  goPhotoPage() { // Added function
    this.navCtrl.push(PhotoPage)
  }
}
We have to make a navigation to the photo page from the home page. For this, we will use the NavController provided by Ionic. The navCtrl.push(page), will push a page to the history stack and navigate the application to that.
To make all of this work, we need to make a new page for the camera plugin. For this, we need to make the file structure under the src/pages folder.
With Ionic-CLI V2, you can use the Ionic generator to simplify this step. Just run this:
ionic generate page Photo
The Photo Page is an html file and its angular component is mainly blank. You can modify the photo.html
<ion-header>
  section as you want.
</ion-header>
<ion-content padding>
  ...
</ion-content>
And the related component code:
import { Component } from '@angular/core';

@Component({
  selector: 'page-photo',
  templateUrl: 'photo.html'
})
export class PhotoPage {
  constructor() {}
}
Before we can use this page, we must register it in the app.module.ts. You need to declare it in the declarations array and in the entryComponents.
...
import { PhotoPage } from '../pages/photo/photo'; // Inject the new page component

@NgModule({
  declarations: [
    ...
    PhotoPage  // Declare the PhotoPage for the app
  ],
  ...
  entryComponents: [
    ...
    PhotoPage // Add the PhotoPage as an entry
  ],
  …
})
export class AppModule {}
For now, we can navigate to the new page from the app.
I don’t want to describe the used styling on the elements, but you can check those in the project’s repository on GitHub.
SETUP THE NATIVE CAMERA PLUGIN WITH IONIC 2
Let’s install the Cordova camera plugin with this command:
ionic plugin add cordova-plugin-camera
Then we can include the camera module into our PhotoPage component:
import { Camera } from 'ionic-native';
To the picture, we need to setup some configurations for the camera. This is a very minimal config, but you can find additional properties in the Ionic native docs.
takePicture() {
  Camera.getPicture({
    correctOrientation: true,
    destinationType: Camera.DestinationType.DATA_URL,
  }).then((imageData) => {
    this.base64Image = 'data:image/jpeg;base64,' + imageData;
  }, (err) => {
    console.error(err);
  });
}
This module can have some quirks because my camera app always started with FRONT camera active, but the doc says you can define the starting camera with this code:
cameraDirection: Camera.Direction.BACK / FRONT (BACK is the default)
But when the camera starts, you can switch the active camera normally.
As you can see, I stored the picture’s base64 data in the base64Image variable and use it in the Html as normal src attribute, like:
<ion-card>
  <img [src]="base64Image"/>
</ion-card>
But, there is an issue with this. I realized that the image couldn’t be found when I started the app.
We need to sanitize the base64 string with the DomSanitizer service.
We can import it into the PhotoPage component
import { DomSanitizer } from '@angular/platform-browser';
and use it with the dependency injection in the constructor:
constructor(
  …
  private DomSanitizer: DomSanitizer
) {}
And replace the html like this:
<ion-card>
  <img [src]="DomSanitizer.bypassSecurityTrustUrl(base64Image)"/>
</ion-card>
After these steps, we can run our application, take a photo and see the preview. The next step will be implementing a persistence layer with local storage and managing the saved photos.
From the next part, you will see how to manage images in the application’s local storage and create a list view from those.
PART2: ADD A LOCAL STORAGE PERSISTENCE LAYER TO YOUR PHOTOS
Localforage is a simple storage with a LocalStorage-like API, and it supports storage technologies such as WebSQL, IndexedDB and LocalStorage.
Temporarily, I will use this storage to persist the taken pictures.
While it’s just base64 data right now, we can store the photos in a string array, where every string will be a base64 representation of the picture.
You will need 2 packages:
- The storage itself
- The typing for this package (if you’re using Typescript)
npm i -S localforagenpm i -D @types/localforage
If it’s done, then we have to make a service to wrap the storage actions. Let’s call it PhotoStorage.
It’s very straightforward. If you need, you can create more independent storages with different configurations to persist data. You can check the configuration steps here.

This is our service class that can be called if we need to invoke get, save and delete actions. It doesn’t have any angular dependencies, as you can see. There are no parameters in the constructor. It contains only minimal and very straightforward callable functions.
import { Injectable } from '@angular/core';
import * as localforage from 'localforage';
import { attempt, isError } from 'lodash';

const PHOTO_COLLECTION = 'photos';

export interface PhotoRecord {
  data: string;
}

@Injectable()
export class PhotoStorage {
  constructor() {}

  getPhotos(): Promise<PhotoRecord[]> {
    return localforage.getItem(PHOTO_COLLECTION).then(photoList => {
      if (!photoList) {
        return [];
      }
      const parsedPhotoList = attempt(() => JSON.parse(photoList as string)) as PhotoRecord[];
      if (isError(parsedPhotoList)) {
        throw parsedPhotoList;
      }
 return parsedPhotoList;
    });
  }

  addPhoto(photoData: string) {
    return this.getPhotos().then(photoList => {
      photoList.push({ data: photoData });
      return localforage.setItem(PHOTO_COLLECTION, JSON.stringify(photoList));
    });
  }

  deletePhoto(index: number) {
    return this.getPhotos().then(photoList => {
      if (photoList && photoList.length) {
        photoList.splice(index, 1);
        return localforage.setItem(PHOTO_COLLECTION, JSON.stringify(photoList));
      }
      return null;
    });
  }
}
In the PhotoPage’s constructor, which is extended with the new service, we can load the already saved photo list. The getPhotos() function will give back a promise with the entire photo array. We can access this value in the "then" statement.
private photoList: PhotoRecord[] = [];

constructor(
    private photoStorage: PhotoStorage,
    private navCtrl: NavController,
    private DomSanitizer: DomSanitizer
) {
    this.photoStorage.getPhotos().then(photos => {
      this.photoList = photos;
    })
}
Using promises is a good way to avoid callback hells.

Besides, we have two new functions: one to add a new photo to LocalStorage, and one to remove from that by its index.
You can see that since after each action, we will reload the complete list from the storage.
<button ion-button icon-left clear item-left (click)="savePicture()">
  <ion-icon name="cloud-upload"></ion-icon> Save
</button>

savePicture() {
  if (this.base64Image !== this.PLACEHOLDER) {
    return this.photoStorage.addPhoto(this.base64Image).then(() => {
      return this.photoStorage.getPhotos()
        .then(photoList => this.photoList = photoList);
    });
  }
  return Promise.resolve();
}
Let’s see the photo remove action.
We need an index for the selected image to find it in the array. This property comes from the ngFor directive’s index value, which will be different for every row. We just need this value because we don’t have any unique identifier for our records. This photoList array is coming from the component that holds the base64 strings for every photo.
<ion-card *ngFor="let photo of photoList; let ind = index">
  <div class="photo-image-wrapper">
    <img [src]="DomSanitizer.bypassSecurityTrustUrl(photo.data)"/>
  </div>
  <ion-item>
    <button ion-button color="danger" icon-left clear item-right (click)="deletePicture(ind)">
      <ion-icon name="trash"></ion-icon>
      Delete
    </button>
  </ion-item>
</ion-card>

deletePicture(index) {
  return this.photoStorage.deletePhoto(index).then(() => {
    return this.photoStorage.getPhotos()
      .then(photoList => this.photoList = photoList);
  });
}
These simple steps make our application able to store the taken images in a temporary storage. This storing procedure is not a production-ready feature because it only keeps the data until the app is reinstalled or the application cache is cleared.
The entire data change is a read-modify-write flow, which has some performance issues, and we also cannot access individual records. But it’s good enough for now.
From part 3, you will learn how to use location plugins to add coordinates to every photo taken and place your images on Google Maps.
PART3: USE LOCATION PLUGINS TO ADD COORDINATES FOR EVERY PHOTO TAKEN AND PLACE YOUR IMAGES ON GOOGLE MAPS
RECEIVE GEOLOCATION FOR EVERY IMAGE
Ionic-native supports geolocation API through a cordova plugin. Firstly, you need to add this plugin to your project.
ionic plugin add cordova-plugin-geolocation
Ionic native provides an API to use the module easily. We need to extend the photo page’s ts-file, the geolocation service, and the coordinates’ interface to the result.
import { Geolocation, Coordinates } from 'ionic-native';
...
private coords: Coordinates = null;
...
Geolocation.getCurrentPosition().then((resp) => {
  this.coords = resp.coords;
}).catch((error) => {
  this.coords = null;
});
This simple change helps us to set our location to the coordinates’ variable. We can use this value at the addPhoto method and store the coordinates in the localstorage. We need to extend the PhotoRecord interface with a coord: coordinates property.
This is how the addPhoto method has changed.
photo.ts:
this.photoStorage.addPhoto(this.base64Image, this.coords)

storage.ts:
addPhoto(photoData: string, coordinates: Coordinates) {
  return this.getPhotos().then(photoList => {
    const coords = this.coordsToJSON(coordinates);
    photoList.push({ data: photoData, coords });
    return localforage.setItem(PHOTO_COLLECTION, JSON.stringify(photoList));
  });
}Hint: The coordinates’ value is always an empty object after JSON.stringify; we need to add a mapping method to make a plain js object:
coordsToJSON(coordinates: Coordinates) : Coordinates {
  return {
    accuracy: coordinates.accuracy,
    altitude: coordinates.altitude,
    altitudeAccuracy: coordinates.altitudeAccuracy,
    heading: coordinates.heading,
    latitude: coordinates.latitude,
    longitude: coordinates.longitude,
    speed: coordinates.speed,
  };
}
We are done with the location part. Let’s continue with the harder part, which is the Google Maps integration.
GET GOOGLE MAPS CREDENTIALS FROM GOOGLE DEVELOPER CONSOLE
We are trying to integrate the GMaps plugin to this page and place markers to the saved photo locations.
The next step is to add the maps cordova plugin to the project, but before that, we need to generate API keys from the Google Developer Console.
1. Login with a Google account and go to the dashboard.
2. Create a new project.
3. Name it whatever you want and click on “Create.” The project will set up in a few seconds.
4. On the project’s page, click on the enable API button.

You have to query for two APIs named:
- Google Maps Android APIGoogle Maps SDK for iOS
5. Click on each API and push the enable button.
When they are enabled, you need some credentials, and a warning message will notify you about this:
The UI will help you create two API keys. One for the Android and one for the iOS app.
I made these API keys without restrictions. Later, you can setup the keys to work only with this specific application. It’s a must-have step for production release, but for now, I will not setup these.
INTEGRATE THE MAPS PLUGIN
After these steps, you can add the cordova plugin to your project using the generated keys.
ionic plugin add cordova-plugin-googlemaps \
--variable API_KEY_FOR_ANDROID="YOUR_ANDROID_API_KEY_IS_HERE" \
--variable API_KEY_FOR_IOS="YOUR_IOS_API_KEY_IS_HERE"
We’re making a new page called Maps with the CLI:
ionic generate page Maps
The maps.html’s ion-content will only have one div containing the maps. Besides it, we’re removing the padding attribute from ion-content to make the map fullscreen without any borders.
<ion-content>
  <div map id="map" class="map"></div>
</ion-content>
We need to add some style to the map because as default, it has no height. To do so we should add some lines to the maps.scss:
page-maps {
  & .map {
    height:100%;
  }
}
Then we can add the initialization code to maps.ts. For me, it looks like this:
import { Component } from '@angular/core';
import {
GoogleMap,
GoogleMapsEvent,
} from 'ionic-native';

@Component({
  selector: 'page-maps',
  templateUrl: 'maps.html'
})
export class MapsPage {
  private map: GoogleMap = null;
  constructor() {}

  ngAfterViewInit() {
    this.initMap();
  }

 initMap() {
    const element: HTMLElement = document.getElementById('map');

    this.map = new GoogleMap(element);
    this.map.one(GoogleMapsEvent.MAP_READY).then(() => {
      console.log('Map is ready!')
    });
  }
}
Now we need to add the new page to the app.module.ts declarations and entryComponents array as we did in the previous part with the Photo page.
Then, we only need to add another navigation card to the home.html:
<ion-card (click)="goMapsPage()">
  <img src="assets/images/photo-menu-bg.jpg"/>
  <div class="card-title">Open maps</div>
</ion-card>
Now we must make the navigation function like the Photo navigation at the home.ts:
goMapsPage() {
  this.navCtrl.push(MapsPage);
}
This is the most basic GMaps integration to an ionic project. We just need to run our application to see the map working as expected.
Note: With this configuration, the maps work properly on Android, but on iOS build, I got a black screen instead of the maps. We need to add some additional css to the maps.scss file to resolve this issue:
ion-app._gmaps_cdv_ .nav-decor{
  background-color: transparent !important;
}
After adding these lines, the maps plugin will work on iOS devices like a charm. :)
LET’S PUT MARKERS ON THE MAP
After these steps, the only thing I want to do is to get the photos array from the PhotoStorage and make a pin for the location (if the image has one).
We need to add PhotoStorage in the constructor:
constructor(private photoStorage: PhotoStorage) {}
When the map inited, we switch the promise callback from console log to a setup function:
this.map.one(GoogleMapsEvent.MAP_READY).then(() => {
 this.loadImagePlaces(this.map);
});

loadImagePlaces(map: GoogleMap) {
  this.photoStorage.getPhotos().then(photos => {
    photos.forEach(photo => {
      const coords = photo.coords as Coordinates;
      if (coords) {
        if (coords.latitude && coords.longitude) {
          this.createMarker(coords, map);
        }
      }
    });
  });
}

createMarker(coords: Coordinates, map: GoogleMap) {
  let place: GoogleMapsLatLng = new GoogleMapsLatLng(coords.latitude, coords.longitude);

  let markerOptions: GoogleMapsMarkerOptions = {
    position: place,
    title: 'Picture'
  };

  map.addMarker(markerOptions);
}
We also add some lifecycle event to clear the map when we leave the page:
ionViewWillLeave() {
  this.clearMap(this.map);
}

clearMap(map) {
  map.clear();
}

ngOnDestroy() {
  this.map.remove();
  this.map = null;
}
To show the image related to the marker, we will render the image to HTML canvas and put it to the marker’s title as base64 string. For this, we will modify the createMarker function a bit.
This is what we want to achieve (before - after):


We put the picture’s base64 string into an HTMLImage element, and when it’s ready, the onload callback function will invoke. In this callback, we’re initailizing an HTML canvas where we render this image.
createMarker(coords: Coordinates, data: string, map: GoogleMap) {
  const place: GoogleMapsLatLng = new GoogleMapsLatLng(coords.latitude, coords.longitude);

  const img = new Image();
  img.onload = () => this.createMarkerWithImage(img, place, map);
  img.src = data;
}

createMarkerWithImage(img: HTMLImageElement, place: GoogleMapsLatLng, map: GoogleMap) {
  const canvas = this.createCanvas(img, window);

  let markerOptions: GoogleMapsMarkerOptions = {
    position: place,
    title: canvas.toDataURL(),
  };

  map.addMarker(markerOptions);
}

createCanvas(img: HTMLImageElement, window: Window) {
  const ratio = this.getRatio(img, window);
  const width = img.width * ratio;
  const height = img.height * ratio;

  return this.drawImageToCanvas(width, height, img);
}
Next, the image’s width and height is calculated to scale the image because of the camera’s resolution.
getRatio(img: HTMLImageElement, window: Window) {
  let ratio = 1;
  if (img.width > img.height) {
    ratio = (window.innerWidth / img.width) * 0.8;
  } else {
    ratio = (window.innerWidth / img.height) * 0.8;
  }
  return ratio;
}
We should display the image on the canvas, and we need to give back the canvas’ reference.
drawImageToCanvas(width: number, height: number, img: HTMLImageElement) {
  const canvas = document.createElement('canvas');
  canvas.width = width;
  canvas.height = height;

  const context = canvas.getContext('2d');
  context.drawImage(img, 0, 0, width, height);
  return canvas;
}
We can get the full base64 representation with toDataURL() function of the created canvas and attach it to the title.
This is a very basic example for using markers on the map with canvas images. Those can be customized in several ways. More detailed info can be found on the plugin’s wiki marker section.
For the canvas part, the full feature set can be seen here. You can check out the HTML canvas reference here.
With a little investigation, we can easily use the Google Maps Plugin in our ionic application. The geolocation plugin was pretty straightforward to use, and we didn’t have any issues with that.
I hope this article was detailed enough to help everyone create their own application with these integrations.
In the next part, I will show you how to switch the localstorage part and use Google’s realtime database (Firebase) instead.
PART4: CHANGE THE PERSISTENCE LAYER WITH FIREBASE, AND MAKE A REAL-TIME APPLICATION
In this part, we will replace the existing localForage storage implementation with Firebase. This will make our application persistent between devices.
Here is what we will do:
- Make an authentication layer to the Firebase API with email based authentication.
- Use Firebase Storage to persist images.
- Use Firebase Realtime Database.
More information about these technologies is available on the Firebase’s site.
We need to sign in to the Firebase webpage with our Google account.
When it’s done, go to the developer console.
We need to make a new project for our application. There is a nice button saying “Add project.” Click it.
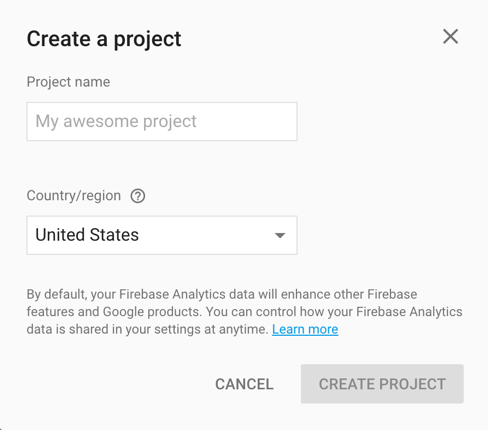
A modal window will pop up and ask you to type in the name of your project. You can type in what you want, or you can import Google project to Firebase (which was created before the Maps API), so I will import this project.
To create a new project, you need to select your region. After you have chosen one, click on the “Create project” button.
It needs a little time to initialize the project. But after it’s done, you can start setting up the necessary resources. Click on the card and you will jump to the project’s dashboard.
Let’s start with authentication.
In the authentication menu, we can setup the authentication providers for our application. I will only enable the email/password authentication, but you can enable more if you want.
Next, we will install the AngularFire2 package to handle the authentication easier. This library offers a simple API, based on Rxjs observables.
Use the following command to install the AngularFire2 package:
npm install angularfire2 firebase --save
At first, we need to initialize the AngularFire module with some config properties:
src/app/app.module.ts
import { AngularFireModule, AuthProviders, AuthMethods } from 'angularfire2';

import * as config from '../config.json';

const firebaseConfig = {
  apiKey: config.apiKey,
  authDomain: config.authDomain,
  databaseURL: config.databaseUrl,
  storageBucket: config.storageBucket,
  messagingSenderId: config.messagingSenderId,
};

const firebaseAuthConfig = {
  provider: AuthProviders.Password,
  method: AuthMethods.Password
};

// and into the imports array we add

imports: [
  ...
  AngularFireModule.initializeApp(firebaseConfig, firebaseAuthConfig)
],
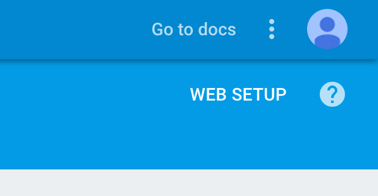
The config.json contains an object that can be copied from the Firebase console. We need to click on the web setup button.
We get a modal that contains the secret keys. There are some lines like these:
// Initialize Firebase
var config = {
    apiKey: "...",
    authDomain: "...",
    databaseURL: "...",
    projectId: "...",
    storageBucket: "...",
    messagingSenderId: "..."
};
We need to use these values above. We can put them directly to the FirebaseConfig object, or we can extract it to a json (without the 'var config = ' part) and gitignore to prevent committing secrets to the public git repository.
I also add an authentication service to separate the auth methods:
src/service/auth.ts
import { Injectable } from '@angular/core';
import { AngularFire } from 'angularfire2';

@Injectable()
export class AuthService {
  constructor(
    public af: AngularFire
  ) {}

  create(email: string, password: string): firebase.Promise<any> {
    return this.af.auth.createUser({ email, password });
  }

  login(email: string, password: string): firebase.Promise<any> {
    return this.af.auth.login({ email, password });
  }

  logout(): firebase.Promise<any> {
    return this.af.auth.logout();
  }
}
These are the base methods that we will use in our components. We define the af: AngularFire provider as public, because we want to access it through the service.
On the home page, we can check the authentication status to change the view states.
We get the af object from the service and subscribe the auth Observable to get notified from the auth status changes.
import { AlertController } from 'ionic-angular';

private user = null;

constructor(
  …
  private alertCtrl: AlertController, // to create modals
  private authService: AuthService,
  private storage: PhotoStorage
) {
  this.authService.af.auth.subscribe((auth) => {
    if (!auth) {
      this.user = null;
      this.storage.initDbByUser(null);
    } else {
      this.user = auth.auth;
      this.storage.initDbByUser(this.user.uid);
    }
  });
}
We store the user object in a private property. We will use this variable to change the view:
// At the title bar we have some buttons: login, logout, signup

<ion-buttons end>
  <button *ngIf="!user" ion-button icon-only (click)="signup()">
    <ion-icon name="person-add"></ion-icon>
  </button>
  <button *ngIf="!user" ion-button icon-only (click)="login()">
    <ion-icon name="log-in"></ion-icon>
  </button>
  <button *ngIf="user" ion-button icon-only (click)="logout()">
    <ion-icon name="log-out"></ion-icon>
  </button>
</ion-buttons>

// At the content we show the menu buttons only when user logged in

<div *ngIf="user">
  <div class="authenticated">
    {{ user.email }}
  </div>

  // … here are the home page items
</div>
We made a logout function which is simple as:
logout() {
  this.authService.logout();
}
Now, we have a signup and login function that will open a modal. We put a handler function that will run after pressing the modal’s “okay” button.
// createModal function was created because the signup and login modal is nearly the same

createModal(title: string, okLabel: string, handler: Function) {
  return this.alertCtrl.create({
    title,
    enableBackdropDismiss: false,
    inputs: [
      {
        name: 'email',
        placeholder: 'E-mail',
        type: 'email',
        value: '',
      },
      {
        name: 'password',
        placeholder: 'Password',
        type: 'password',
        value: '',
      }
    ],
    buttons: [
      {
        text: 'Cancel',
        role: 'cancel',
      },
      {
        text: okLabel,
        handler,
      }
    ]
  });
}

// the first two parameters are only labels,
// the third parameter is the handler function which is called after
// pressing the Register/Login button

signup() {
  const alert = this.createModal('Sign Up', 'Register', (data) => {
    if (this.isValid(data.email, data.password)) {
      this.authService.create(data.email, data.password);
    } else {
      return false;
    }
  });
  alert.present();
}

login() {
  const alert = this.createModal('Login', 'Login', (data) => {
    if (this.isValid(data.email, data.password)) {
      this.authService.login(data.email, data.password);
    } else {
      return false;
    }
  });
  alert.present();
}

// very minimal valdation to make sure the fields are filled

isValid(username, password) {
  return username && password;
}
These steps will allow us to make a simple authentication process to our application through the Firebase API.
I hope these steps help you integrate Firebase auth to any Angular application.
Some additional information about the AngularFire2: this library also can handle the Realtime-database actions with a simpler and more developer-friendly way than the Firebase SDK.
Unfortunately, it doesn’t handle the Firebase Storage part of the application. So, if you want to make more consistent applications, instead of multiple libraries, you can make all these steps with the original SDK with a little bit different API, but I think the AngularFire is a very useful util to Angular applications.
You can check out the whole application repository on my GitHub. If you like it, please put a star on this repo. :)

_ We’re a full-stack web development agency, building web applications from design to delivery with Angular, React, and Node.js