
File uploading is one of the most essential features of web development. And yet, it could be really time and energy-consuming if you aren’t careful enough. Also, debugging why your file isn’t uploaded to that AWS S3 bucket is a pretty tough thing to do.
In this post, I want to show you how to handle this problem in a really simple way, highlighting the pitfalls I have come across.
Hopefully, after reading this post, you can easily write your own storage service using Minio locally and Bucketeer on Heroku. In the sample, I used Node.js and Fastify on the backend, Angular on the frontend, and PostgreSQL for the database.
In my most recent project, I got a task to implement a basic file storage service to allow the users to upload profile pictures to their profile. Nothing fancy or extraordinary.
At first glance, I thought, “Okay, this shouldn’t be too complex.” In the first 4 years of my web developer career, I never had the opportunity to actually implement such a service, but obviously, I worked on many projects where my team used AWS S3 to store files in it.
So I started to plan what I wanted to achieve.
A standard way to do this in this case is to create an endpoint on the backend side where the frontend could get a pre-signed URL, and then the frontend would use that pre-signed URL to actually upload the file itself.
Implementing our backend for file upload with Fastify
I will use a basic Fastify-based backend skeleton, including a PostgreSQL database. It is not in this post’s scope to explain this skeleton’s structure or to show how to connect the database, so I will focus on the file upload.
The plan is to create a simple web application where we can upload images with a title and then list these images.
First, we need the aws-sdk package:
npm install aws-sdk
We will also use uuid in order to generate id-s:
npm install uuid
Let’s set up AWS in our app.ts. Import AWS in the following way:
And in our start function:
Here we use config variables for configuring the AWS.S3, as it needs different configuration locally and in production. As you can see, we have a config variable named useMinIO, which determines if we pass MinIO specific config to AWS.S3 or not. The variable defaults to false, so in order to use local MinIO, we have to set it to true in our .env file:
Let’s continue with the heart of this feature, the storage service. Create a storage folder under src/framework, and create a storage-service.ts file:
Here we construct the interface of our service, which includes the mentioned getSignedURLForUpload method, as well as the createPublicBucketIfNotExists (more on this later).
Okay, now that we have the interface, we need to create the actual service. Create a file named storage-service-s3.ts:
First, let’s see the getSignedURLForUpload method. It gets the bucket’s name, a key, and the content type as arguments. Firstly, we just pass the bucket and the key to the s3.getSignedUrlPromise, as well as the urlExpirationSeconds, which the factory gets - it would be also a config variable in our case, but we’ll get there later.
Then we add the cache control policy manually. The last input is the content type, and this is the point where I must highlight to always use decodeURIComponent, as the content type we get from the frontend request’s header would be something like this: image%2Fpng, and we do not want that.
Using this method, we can request a signed URL from S3, and we can use that to upload the file. Superb!
Now look at the other service method we defined:
Now, we define a bucket policy. Here we allow everyone to put files into and get files from our bucket. Of course, you can define a more strict policy, but in our case, we don’t really need anything strict regarding the bucket policy.
Then, we check if the bucket already exists. If it does not, we create it.
Another important thing to do is to set the cors policy. Here we define a simple and again not too strict cors policy. Keep in mind that MinIO does not support cors policy, so we catch that error if we use MinIO locally. Finally, we add our bucket policy to our bucket.
Now we have everything we need regarding the storage service, except we have yet to import it into the app.ts:
As I have mentioned before, the urlExpirationSeconds also comes from our config file.
So now we have a storage service capable of creating a bucket and getting a pre-signed URL. So far, so good.
Creating our necessary services
As I have mentioned before, my plan was to create a web app where we can add an image with a title and upload that image, with an images list in place as well.
In order to have that, we need to create all the necessary endpoints our frontend would need.
The backend, I use has a pretty ordinary structure, where endpoints don’t contain business logic. Instead, we’ll have use cases for that, and we will also use a service layer in order to access the database layer.
First, define the ImageWithTitle object. For that, create an image.ts file under src/domain/image:
Obviously, we want to have methods for putting into and getting out ImageWithTitle objects from our database. For that, we create an image service under the same image folder:
We created a create and a getAll method, and these are all we need. imageRepo is the database layer, but again it’s not in this post’s scope to explain how we connect our SQL database into our node backend.
If you want to read more about how to connect your SQL DB to a node backend, check out this post.
Next, let’s focus on the use cases. We need one for the get pre-signed URL endpoint, as well as for the add image with title endpoint and the get all images endpoint.
Our get pre-signed URL use case looks like this:
The use case gets an input with a fileType, which is eventually the content type. Inside the use case, we call the getSignedURLForUpload from the newly created storage service, and we pass the bucketName, the content type, and a random number from 0 to 1000, which would be the image’s key. In this case, this is the last segment of the image’s upload URL.
Now, we can construct the endpoint, which would call this use case we just created. As I have already pointed out, endpoints don’t contain any logic in this backend; they just get the inputs from the API call and pass them forward to the use cases.
As one can see, there are a few types and OA responses imported. I do not want to get into those, as they are not strongly related to our file upload problem.
Similar to the endpoint use case pair above, we can create the add image and the list images endpoints as well with their corresponding use cases. The add image use case is the following.
Here we just add the ImageWithTitle object to our database. The corresponding endpoint calls the use case without any other logic.
Lastly, let’s see the “List images use case,” where we call the getAll method from our imageService. It contains server-side paging, but we do not really use it in our file upload sample (I strongly advise you to always implement server-side paging if you are dealing with any kind of listing, especially when your app has multiple lists).
Now we have just two things left to finish our sample backend. First, we have to import everything to the app.ts.
And second, we need to define a MinIO instance next to the Postgres instance in our docker-compose.yml:
With this, if we run docker-compose up in the terminal, we will have a MinIO running under port 9000. We can set the MinIO’s values to default values in our config files, so if we do not set our S3 credentials in the config (in .env for instance), it will fall back to our local MinIO.
Creating our frontend
It’s time to turn our heads to the frontend side of this mini project.
We will use a basic ng new app with SCSS styling. I wanted to use bootstrap, as it is really easy to use, and our app won’t look completely awful, but I should warn you in advance that styling isn’t that important for creating our proof of concept.
In order to start our frontend development, we should create the new Angular app:
ng new file-upload-frontend --style scss
This will create the app and install all the initial modules. Next, go into our newly created folder and install a few libraries we will use:
npm install bootstrap buffer file-type ngx-image-cropper
The latter is a really easy-to-use image cropper link, which I personally like to use on a basic image upload screen. Don’t forget to import the necessary modules into the app.module.ts.
We also added bootstrap, so let’s import that into our styles.scss:
Now we can use all the built-in classes bootstrap provides. It is time to write some HTML into our app.component.html.
Here we have a simple form with a text input, which asks for an image title from the user. Below that, we have a file input, which has a class d-none, referring to display: none; which means that this element won’t be rendered onto the screen. Instead of this file input, we use a custom button for triggering the file inspector, and that button refers to the file input above (click)=”fileUpload.click()”
After we select an image from our computer, the fileChangeEvent() method will trigger, and that will be the point where we set the imageChangedEvent the image-cropper listens to.
Now we have a form where we can select an image and add a title. Awesome!
All we need to do is connect this to our backend. Let’s turn our heads to the app.component.ts:
Let’s go one by one. We already touched the fileChangeEvent(), where we pass the file input event to the variable named imageChangedEvent.
The imageCropped method is called whenever the image-cropper outputs a new image - so when the user crops the selected image. All this method does is call prepareImage() method with the event.base64.
Before our first API call, we have to convert our base64 string (image-cropper’s imageCroppedEvent type contains this) into an actual file our backend could handle. For this, we will use a basic dataURItoFile helper function:
With the help of this function, we have a file type with a mimeType as well. Now we can call the first endpoint we need, where we get the pre-signed URL.
Once we have this pre-signed URL in our hands, we just have to call that URL with a put method and pass the image file to the call. Here we set a cache control to max-age=0. Keep in mind that this setting needs to be the same as the one we set in our backend:
Basically, we implemented the file upload on our frontend. Whenever we crop an image with the help of the image-cropper, our app calls the get pre-signed URL endpoint where it gets an URL, and then it uploads the converted file onto that URL.
We could stop right here, check our bucket if the file is there, and live happily ever after. But I wanted this sample project to be a whole, so we will keep going and connect the add image endpoint as well as the list images endpoint.
For submitting the image, add the following to the app.component.ts:
With these, if we click the submit button, we will call the add image endpoint, and eventually, it will save the image title and URL into our database.
Finally, we can list the images we’ve already uploaded:
And we also need a bit more HTML. After the first col-sm-6 div element, add the following:
Let’s start things up!
npm run start:local
And on the backend:
docker-compose up -d
yarn start:dev
Type localhost:4200 into the browser, and you’ll probably see a blank white screen with a console error message:
Uncaught ReferenceError: global is not defined
As per many StackOverflow and GitHub issues it could be solved by passing these lines into the polyfills.ts:
That’s it. We can now upload images onto our MinIO bucket! For example, this screenshot about the usage share of desktop browsers from Wikipedia:
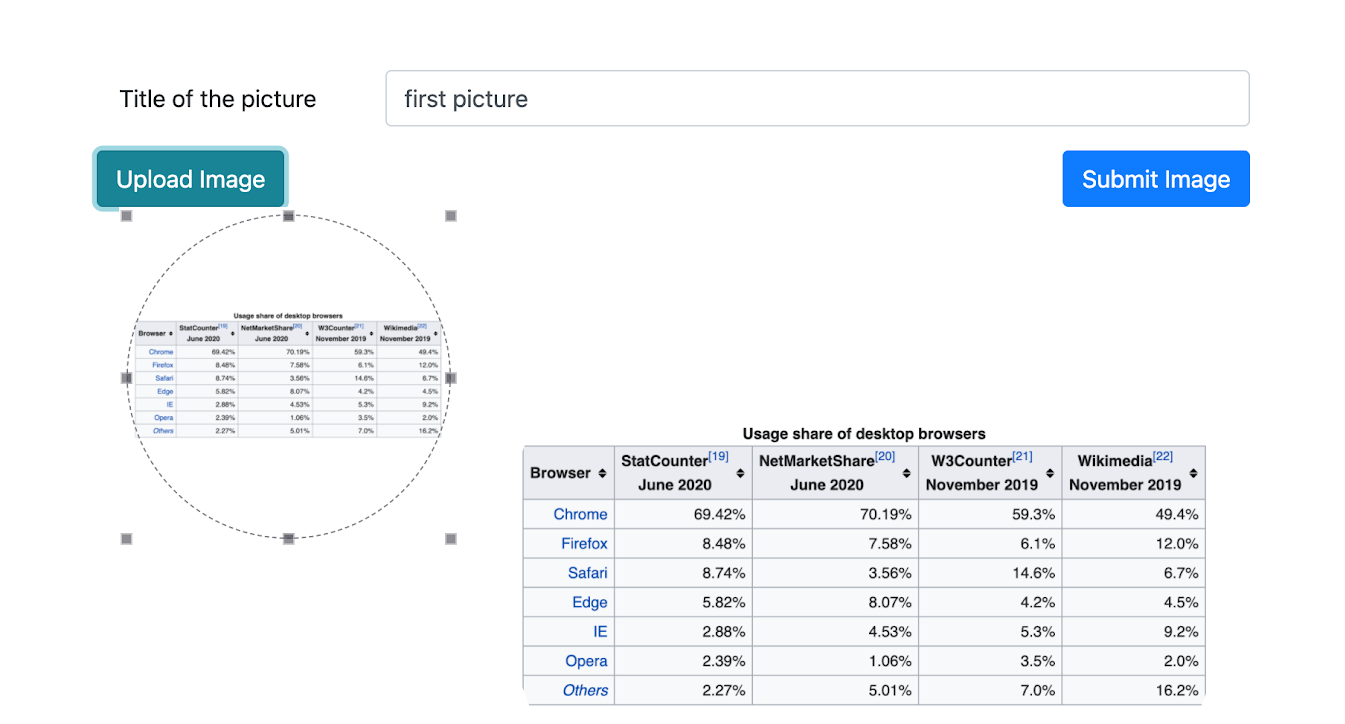
After clicking the submit button, we will see the image on the right side of the screen:

Connecting Bucketeer to Heroku
Although it is great that we can upload files into a bucket running on Docker on our machine, usually we are not satisfied with this. We want cloud-based storage for our application.
As I have mentioned in the introduction, I recently used Bucketeer on Heroku for storing profile pictures. So let’s set up Bucketeer for our sample application!
I assume you already have a Heroku account and you’re familiar with creating a new app on Heroku. If you are not, Heroku has a nice beginner’s guide.
Assuming we already have a Heroku application up and running, let’s see how to connect Bucketeer to it.
First, head over to the resources tab on the application’s dashboard on Heroku, and search for Bucketeer on the add-ons input as below.

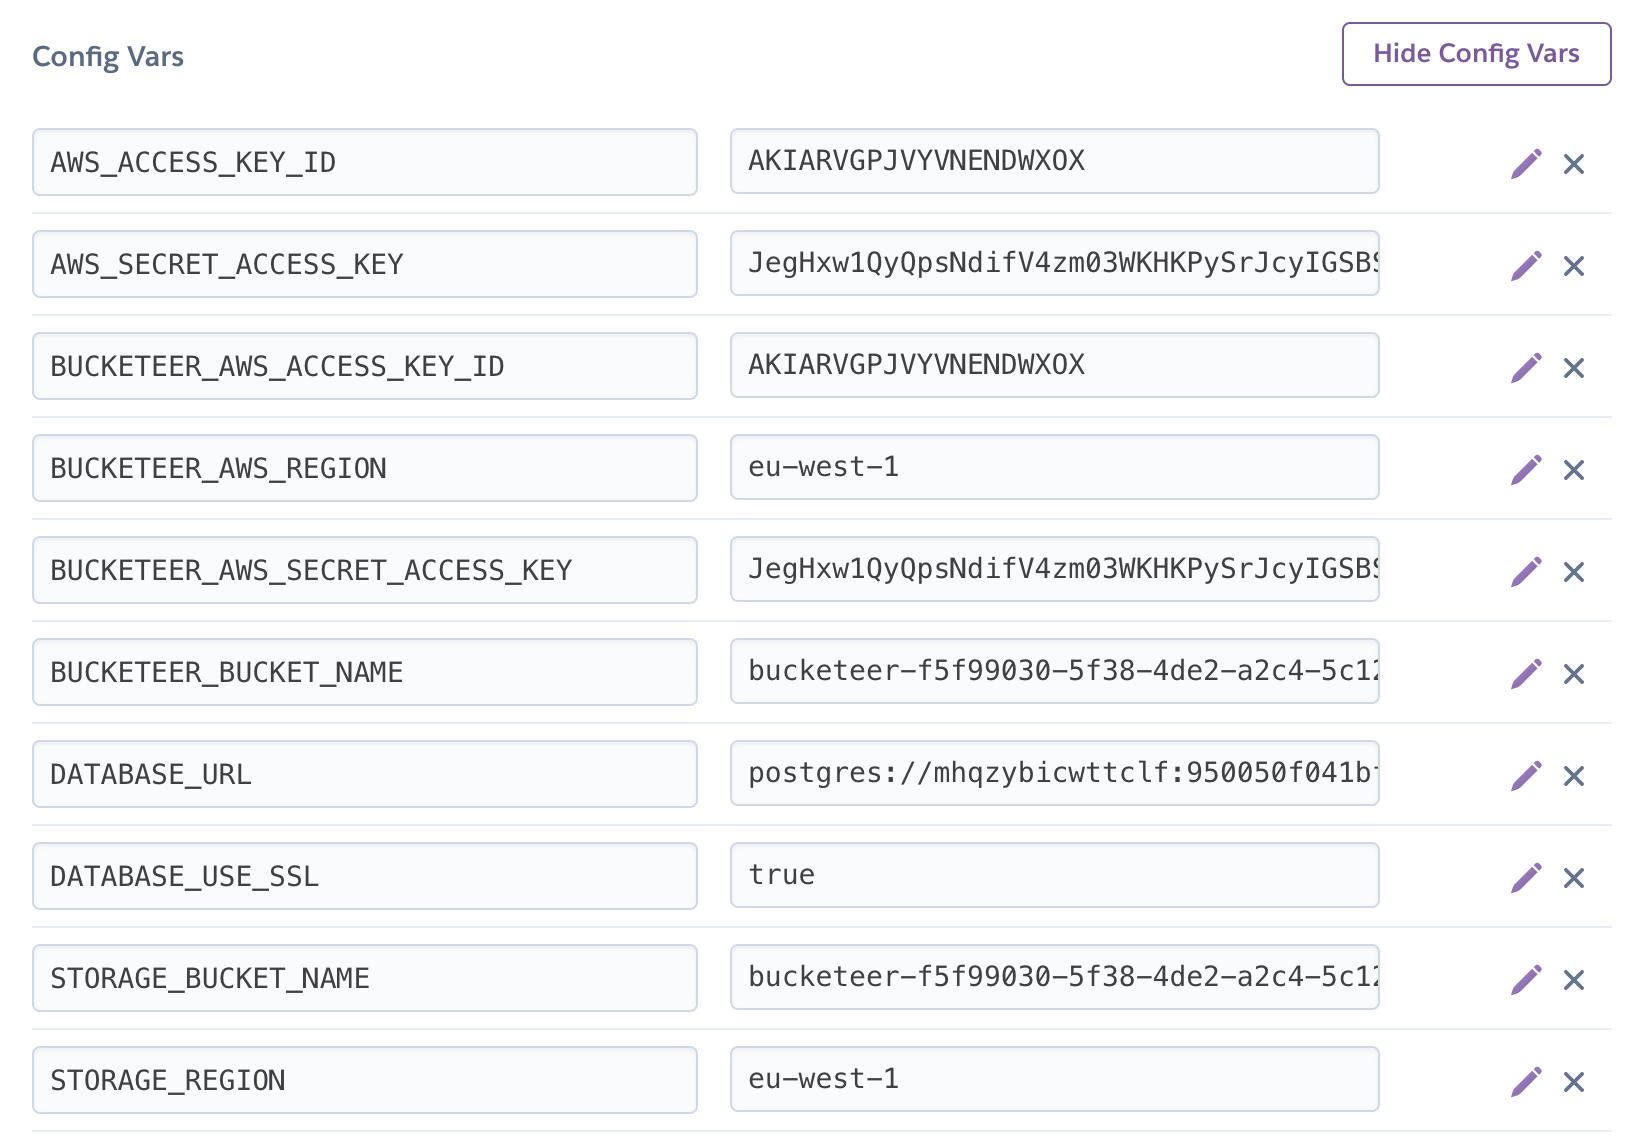
After you click on it, you will be prompted to select a plan, we will use the default Hobby plan in our case. Heroku sets Bucketeer up, and you can already see the config variables on the settings tab.
We must also add the AWS_ACCESS_KEY_ID, the AWS_SECRET_ACCESS_KEY, the STORAGE_BUCKET_NAME, and the STORAGE_REGION variables with the corresponding values, as we defined these variables in our config file so our app will search for these names in order to get the storage credentials. You can define these config variables with any key you like, but be aware that the variables generated by Heroku for Bucketeer might not have the same key names you have prepared for.
We’re done! We can try this if we take these secrets and pass them onto our .env file:
Remember that we used the USE_MINIO config variable to switch between local MiniIO and deployed Bucketeer.

_ We’re a full-stack web development agency, building web applications from design to delivery with Angular, React, and Node.js